Slack に通知する
もし森の中でテストが失敗し、誰もそれが赤くなったことを確認できないとしたら、それは本当に失敗と言えるのでしょうか?

あなたの Job は、人がいなくても自動的に起動することができますが、その結果が知らされなければ、失敗するとおおよそ役に立ちません。Slack を使用している場合、またはチームがハングアウトしている別のチャットルームを使用している場合、パイプラインで失敗または成功を通知することをお勧めします。
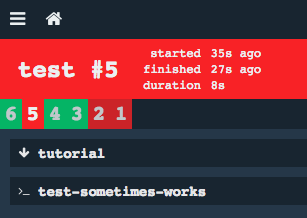
ここでは50%の確率で失敗するものの、誰にも通知しない寡黙な Job を考えてみましょう。
resources:
- name: tutorial
  type: git
  source:
    uri: https://github.com/starkandwayne/concourse-tutorial.git
    branch: develop

jobs:
- name: test
  public: true
  serial: true
  plan:
  - do:
    - get: tutorial
      trigger: true
    - task: test-sometimes-works
      config:
        platform: linux
        image_resource:
          type: docker-image
          source: {repository: busybox}
        inputs:
        - name: tutorial
        run:
          path: tutorial/tutorials/miscellaneous/slack-notifications/test-sometimes-works.sh
このパイプラインを作成し、Job:test を数回実行してください。 時にはそれは成功し、それ以外の時は失敗するでしょう。
cd tutorials/miscellaneous/slack-notifications
fly -t bucc set-pipeline -p slack-notifications -c pipeline-no-notifications.yml
fly -t bucc unpause-pipeline -p slack-notifications
fly -t bucc trigger-job -j slack-notifications/test -w
fly -t bucc trigger-job -j slack-notifications/test -w
fly -t bucc trigger-job -j slack-notifications/test -w
fly -t bucc trigger-job -j slack-notifications/test -w
fly -t bucc trigger-job -j slack-notifications/test -w
fly -t bucc trigger-job -j slack-notifications/test -w
Custom Resource Types
Slackの場合、Custom Resource Type cfcommunity/slack-notification-resource があります(Githubのソースを確認してください)。pipeline.yml で YAML の最上位階層に resource_types の項目を追加することで、に Custom Resource Type を追加することができます。
resource_types:
- name: slack-notification
  type: docker-image
  source:
    repository: cfcommunity/slack-notification-resource
resources:
- name: notify
  type: slack-notification
  source:
    url: ((slack-webhook))
Slack organization に参加する
Slack 通知を送信したいと考えます。まずワークスペースを作成するか、既存のワークスペースから招待を受ける必要があります。
以下の例では、今は亡き https://concourseci.slack.com のワークスペースを使用します。あなたのワークスペース名で concourseci の部分を読み替えてください。
Slack Web Hooks
あなたの Slack ワークスペースで、/services/new/incoming-webhook にアクセスしてください。例えば、concourseci のワークスペースなら以下の通りです:
https://concourseci.slack.com/services/new/incoming-webhook/
通知が配信されるパブリックチャンネル、またはプライベートチャンネルを選択します。 このチュートリアルでは、あなた自身へのダイレクトメッセージチャンネル「@アカウント名(あなた)へプライベートで」を選んでください。

「Incoming Webhook インテグレーションの追加」ボタンをクリックします。
次のページで、ユニークなシークレットURLが与えられます。 トリプルクリックして選択し、クリップボードにコピーします。

各 パイプラインは、独自に ((slack-webhook)) パラメータを持ち、異なる Slack チャンネルに通知を送りたいはずです。そのため、URLを パイプライン固有の場所に保存しておきます(bucc プロジェクトで bucc credhub を実行して、Credhub に再ログインしておいてください)。
credhub set -n /concourse/main/slack-notifications/slack-webhook -t value -v https://hooks.slack.com/services/T02FXXXXX/B8FLXXXXX/vfnkP8lwogK0uYDZCxxxxxxx
Job が失敗したら通知する
もしまだやっていなければ、pipeline.yml に resource_types セクションと、上記のCustom Resource Types で紹介した resourcesセクションを追加しておいてください。
次に、すべてのビルド計画のステップに、on_failure セクションを追加する必要があります。
ビルド計画のget, put, task では、その失敗を捕らえて何らかのアクションを設定することができます。 Concourse CI documentation より:
plan:
- get: foo
- task: unit
  file: foo/unit.yml
  on_failure:
    task: alert
    file: foo/alert.yml
私たちの パイプラインでは, on_failure を task: test-sometimes-works に追加します:
  - task: test-sometimes-works
    config:
      ...
      run:
        path: tutorial/tutorials/miscellaneous/slack-notifications/test-sometimes-works.sh
    on_failure:
      put: notify
      params:
        text: "Job 'test' failed"
on_failure を使用して notify という名前の slack-notification Resource を呼び出し、((slack-webhook)) で指定した web hook にメッセージを送ります。
パイプラインを更新し、失敗するまで test Job を起動してください:
fly -t bucc set-pipeline -p slack-notifications -c pipeline-slack-failures.yml
fly -t bucc trigger-job -j slack-notifications/test -w
あなたのナイスな失敗は、Slack の通知として表示されます:

通知メッセージを動的に変更する
前のセクションでは、通知テキストは pipeline-slack-failures.yml ファイル内にハードコードされていましたが、通知用の動的なメッセージを生成することも可能です。
成功通知を発行することももちろんできます。
下の例では、2つの通知があります( Slack は同じ送信者からのメッセージを結合してスペースを節約します)。各メッセージには、動的に情報が含まれています。

使用されている slack-notification-resource の README から、textと text_file パラメータがあることがわかります.
https://github.com/cloudfoundry-community/slack-notification-resource#out-sends-message-to-slack
text: 送信するメッセージの静的なテキスト。text_file: 送信するメッセージを含むファイル。これにより、Concourse Job の前の Task ステップでメッセージを生成することができます。
text から text_file に切り替えます。
on_success のステップフックを追加して、task:test-sometimes-works ステップの成功と失敗の両方の結果を明示的にキャッチし、メッセージを表示します。
jobs:
- name: test
  public: true
  serial: true
  plan:
  - get: tutorial
    trigger: true
  - task: test-sometimes-works
    config:
      platform: linux
      image_resource:
        type: docker-image
        source: {repository: busybox}
      inputs:
      - name: tutorial
      outputs:
      - name: notify_message
      run:
        path: tutorial/tutorials/miscellaneous/slack-notifications/test-sometimes-works-notify-message.sh
    on_success:
      put: notify
      params:
        text_file: notify_message/message
    on_failure:
      put: notify
      params:
        text_file: notify_message/message
上記の notify-message フォルダは、task:test-sometimes-works ステップによって出力として生成され、 put:notify Resource によって利用されます。このトピックを修正するには、 Basic セクション: 成功した Task の outputs を別の Task の inputs にする を参照してください。
task: test-sometimes-works のステップでは、test-sometimes-works-notify-message.sh スクリプトを実行しています。これは test-sometimes-works.sh とやっていることは同じですが、notify_message/message を生成していることに注目してください。
value=$RANDOM
if [[ $value -gt 16384 ]]; then
  cat > notify_message/message <<EOF
Unfortunately the \`test\` job failed. The random value $value needed to be less than 16384 to succeed.
EOF
  exit 1
else
  cat > notify_message/message <<EOF
Hurray! The \`test\` job succeeded. The random value $value needed to be less than 16384 to succeed.
EOF
  exit 0
fi
失敗した場合、メッセージは "Unforuntately..." で始まります。 成功すると、メッセージは "Harray!" で始まります。

Slack メッセージの内容については、 https://api.slack.com/incoming-webhooks をご覧ください。
パイプラインをアップグレードし、Job:test を数回実行して成功と失敗の通知を確認したい場合、以下のように実行してください:
fly -t bucc set-pipeline -p slack-notifications -c pipeline-dynamic-messages.yml
fly -t bucc trigger-job -j slack-notifications/test -w
fly -t bucc trigger-job -j slack-notifications/test -w
fly -t bucc trigger-job -j slack-notifications/test -w
fly -t bucc trigger-job -j slack-notifications/test -w
メッセージの Metadata をカスタマイズする
今回作った Slack 通知はかなりそっけないように見えます:
Our Slack notifications above are pretty bland:

カスタムイメージとユーザ名で、それらにアクセントを加えましょう:

また、on_success セクションと on_failure セクションを両方実行できる ensure ブロックにそれらを集約することもできます:
  - task: test-sometimes-works
    ...
    ensure:
      put: notify
      params:
        username:  starkandwayne-ci
        icon_url:  https://www.starkandwayne.com/assets/images/shield-blue-50x50.png
        text_file: notify_message/message
パイプラインをアップグレードし、Job:test を数回実行して成功と失敗の通知を確認するには、以下のように実行してください:
fly -t bucc set-pipeline -p slack-notifications -c pipeline-custom-metadata.yml
fly -t bucc trigger-job -j slack-notifications/test -w
fly -t bucc trigger-job -j slack-notifications/test -w
fly -t bucc trigger-job -j slack-notifications/test -w
fly -t bucc trigger-job -j slack-notifications/test -w